CHRISTMAS PINE

LASDI©

Amid all the hullabaloo, the to-and-fro, and the busiest time of year since EVER, it's okay to treat yourself in a way you can still rely on not to expand your waistband for the holiday season.  This is a great way to have a holiday treat without inflammation as you destress from the hordes of chaos outside. This was an appetizer I made when The Kid brought The DIL and our Litlelest Grittle for dinner, which happens to be during the holiday season.  Being our youngest, he seems to be the one that will eat just about anything, and not quite as picky as his siblings.  So I knew he would be adventurous enough to try it - and he LOVED IT! I then used the lone leftover piece for The Hubster's brekkie the next morning with a sunny egg and it went over even better than the night before! As the intense themer I am, I also felt pine nuts and rosemary added just the right Christmas touch to the very Italian meal I made. So READ ON, Readers!  And then make yourself a magical dish that can do just as well as an app, a side, or a main!  Or even leftovers!
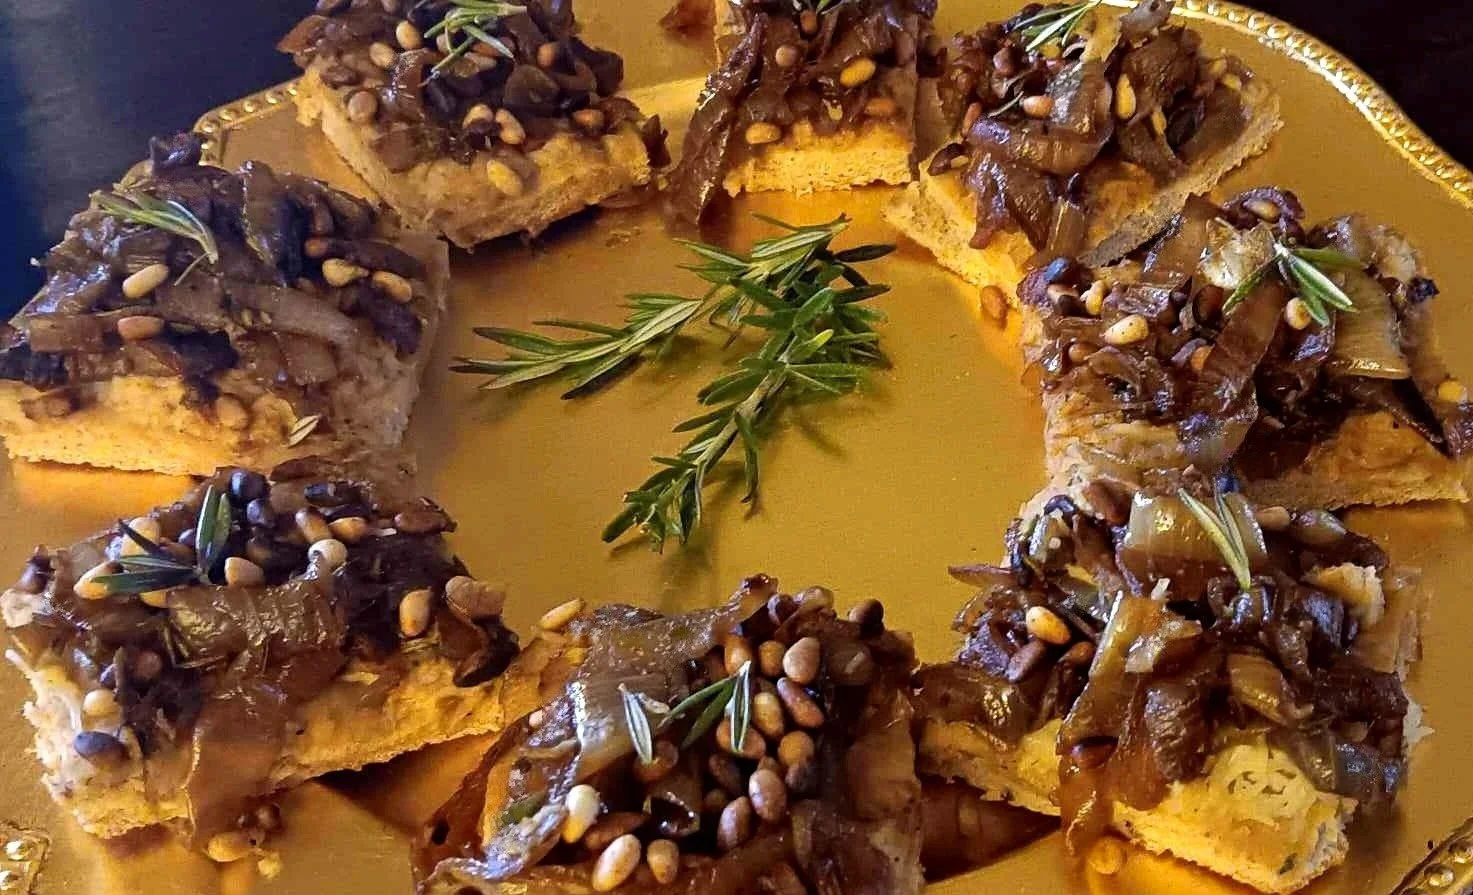
CHRISTMAS PINE

(PINE NUT BRANDIED CARAMELIZED ONION ROSEMARY FLATBREAD)

1 1/2 cups pine nuts

extra virgin olive oil (evoo)

8 onions, sliced

1/2 cup brandy

4 sprigs rosemary, minced

your favorite low-carb crust (see notes)

2 cups shredded mozzarella cheese

sea salt, to taste,

pepper, to taste

Start by setting your oven to 375.  Next, pour your pine nuts into a preheated pan on medium-high heat, stirring and shaking them around every thirty seconds or so until browned and toasted - about five minutes. Set those aside and allow them to cool whilst you start the onions cooking by pouring about two teaspoons of evoo into a heavy pan (I use my cast iron!) over medium-high heat.  Add your onions (see notes).  Now LEAVE THEM ALONE.  Though you may feel the urge to stir - DON'T!  Let them cook for two minutes, stir, then leave them alone again!    Repeat this process for about fifteen minutes, or until onions are browned and the edges look a tad crispy.  Pour half of your brandy in and let cook for one minute.  Sprinkle your rosemary in and stir.  Pour the other half of your brandy in and allow to continue to cook another minute or two.  Remove from heat and let cool.  Once cooled, put your mozz on your flatbread or pizza crust (see notes), sprinkle the onions over the entire crust, then top with pine nuts.  Put into the oven for seven to ten minutes, or until cheese is melted and onion-nut mixture is heated through.  Cut into desired-sized pieces and garnish with rosemary if ya like!

NOTES: As the Low-Carb Girl of The Fam, I pre-make the King Arthur's Keto Pizza Crust mix, but you can use whatever your favorite low-carb or regular pizza crust recipe or pre-made crust you wish!   It may seem that the onions are overloading the pan, but they will break down by the first time you carefully stir.  Make sure your crust or flatbread is pre-cooked and ready to have the ingredients put on.  Enjoy! And Merry Christmas!

BURNT OUT

LASDI©

Oh boy. That’s a scary title for a recipe! It is a phrase we don’t like to hear when it comes to life, and it is DEFINITELY a phrase we don’t want to associate with what we COOK!

I have to tell you it is so fitting for me at this particular time in my own life! This last week has been spent getting our home sale-ready, which means all furniture out and into storage, painting, cleaning, and repairing, waiting for our newest Grittle (GRAND Little) to be born, speaking engagements, catering jobs, and singing gigs coming my way (yay!), and all the while having to do the normal life things, too, of course!

I’m not burnt out as it were, but I sure am TIRED! So dinner last night had to be quick, easy, and nutritious, and still be DELICIOUS! Well this really hit the mark!

Red meat is a rare treat in our house (no pun intended!) but as a reward for all the hard work we’ve put in, I made a gorgeous flank steak with some of my famous chimichurri sauce and was looking for a way to incorporate the veggies I had in the fridge to go along with it.

I found leeks, delicata squash, broccolini, green beans, carrots, purple cabbage, garlic cloves, and red chard, and I garnished it with the carrot tops.

I realized this would be fantastic as an appetizer tray, or alongside a charcuterie, too! The best part about the recipe I am about to share with you is how completely flexible and inter-changeable it is! Isn’t that exactly what we need in our life so we don’t get burnt out?

CHARRED V EGGIE TRAY

WHATEVER VEGGIES YOU WANT! (fresh, not frozen) (prepared by cutting, slicing, dicing, or leaving whole)

evoo (extra virgin olive oil)

sea salt

pepper

garlic powder

chili powder

(OR WHATEVER SEASONING YOU LIKE!)

On a stainless steel or non-stick baking sheet (see notes), strategically place all your veggies together however you like. VERY LIGHTLY sprinkle evoo over the top of the veggies (see notes). Sprinkle the seasonings from a high point over the veggies (see notes). Place your oven broiler on high and place the baking sheet on the top rack of the oven. Set a timer for five minutes and check on the veggies to make certain they are not burning. Charred is completely different from burnt! Set the timer for every three minutes afterwards, rotating your baking sheet each time, and char to desired color and consistency. Take note during the process that charred veggies will ultimately be al dente so try not to overcook and send them into the burnt abyss!

NOTES: If you do not own a stainless steel or non-stick baking sheet, my suggestion is to prepare whatever baking sheet you have with parchment paper so that the veggies do not stick to the pan. The key to charring in a broiler is to not use too much oil so that the veggies maintain their integrity and don’t get mushy, so as you are sprinkling, either place a finger in the spout of the oil, or pour in your hand and gently and tenderly sprinkle over the top of the veggies. It is important to sprinkle the seasonings from a highter point to ensure the veggies are evenly seasoned. You and / or your guests will be wowed by this edible painting!

LIFE'S A BEACH

LASDI©

LASDI©

This particular catering gig was in June, so being the Themer-Girl I am, it only made sense that the summer menu was called Beach Party Roast.  It consisted of roasted salmon, roasted mini-sweet peppers loaded with green onion, cream cheese, and shredded cheddar, roasted asparagus, roasted beach bread, and sandy beach parfaits that I found a recipe for from a Texas-girl blogger.  With all of that yumminess, the peppers got quite a bit of attention.  I had the opportunity to pop a few in my mouth, and could completely see why they were so addictive!  Plus they're easy to make and low-carb!!  Shout out to The Daughts for the cute-and-appropriate title to this post!

MINI SWEET PEPPER POPPERS

1 bag tri-colored mini sweet peppers (about 20) seeded, and cut lengthwise

1 block cream cheese

1 1/2 cups shredded cheddar cheese

1 bunch green onion, sliced thin (both green and white ends)

1 tsp sea salt

1 tsp pepper

Combine cream cheese, shredded cheddar, green onion, sea salt and pepper in a bowl.  Microwave for 15 seconds.  Mix well with a spoon and let stand about a minute or two.  Scoop a mound of cheese mixture into each pepper and press into pepper, careful not to over-mound so your cheese doesn't leak out during cooking.  Refrigerate for about an hour.  Heat oven to 400 degrees and bake peppers for 20 minutes; switch oven to broiler and broil peppers until cheese is brown and bubbly - about five minutes.  Let rest five minutes before serving, then pop a few in your mouth before putting them on the table because they go quick!!

NOTES: These are great for your Vegetarian Friends.  For you Meat Eaters, and for extra flavor, you can crumble some bacon into the cheese mixture, or just about anything you like!  I know an entire bunch of green onion seems like a lot, but it really lends an herbaceous, chivey taste to these loves.  For July, and some added heat, I use jalapenos in place of the sweet peppers for hot pepper poppers!  These are great served warm or room temperature and make a great side or appetizer.  

Potatoes, Patatas

LASDI© (Photos by Adrian Garcia)

LASDI© (Photos by Adrian Garcia)

Another tapas night with friends.  I ALWAYS look forward to those nights because we put our heads and cooking prowess together and come up with a tornado of tapas!  While The Hubster and I waited for our sweet neighbors to arrive, we went ahead and snapped some pics of what we put out for our half, and ohhhhhhh, BOY!  This stuff was BEYOND BUENO!

I made mushroom-, pine nut-, and cheddar cheese-stuffed puff pastries, prosciutto-wrapped asparagus, mini-Reuben sammies (it IS March, after all!), a quite-lovely cheese board with the sharpest cheddar and GORGEOUS artichoke hearts (stems included!).  All those hyphened menu items!  But to be as authentic as possible, I made a legit tapas called patatas bravas.  I, of course put my own spin on it and they were delcioso!

Go on and spend a night with community and each of you bring a prize!  Call it tapas night or call it whatever you want - just bring THESE to the table with you!

PATATAS BRAVAS

4 - 5 butter gold potatoes, scrubbed, dried, and sliced lengthwise into 8 wedges

1 1/2 cups canola oil

sea salt

pepper

1/4 cup prepared horseradish

1/4 cup sour cream

paprika

1 can ro-tel for dipping

4 green onions or scallions, sliced thin

Heat canola oil in heavy skillet (I use my cast-iron, of course) on medium-high heat for two minutes.  Place potato wedges from one potato carefully into oil.  Let cook for five minutes.  You will be tempted to turn them over before then.  Don't.  After five minutes, flip them and let them cook another five minutes.  You will be tempted to pull them out before the five minutes is up.  Don't.  Carefully take them out one at a time and lay them on a cooling rack with paper towel underneath (see notes).  Sprinkle them liberally with sea salt and pepper.  Repeat cooking with the next potato and directly before removing them from the oil, lay the first batch on whatever tray or plate you would like to use for your display. While the next batch of potatoes are cooking, mix the horseradish and sour cream and drizzle (prettily!) over the potatoes on the platter.  Sprinkle with paprika and then a bit of green onion.  Repeat with each layer of potatoes, crisscrossing each layer over one another for an authentic look. 

Notes: Any heavy skillet will do as long as it is deep enough to fit the oil.  For crispy potatoes, use the cooling rack.  If you don't have one or want softer potato wedges, simply dry them on paper towels laid on a plate or platter.  I use a condiment squeeze bottle for the horseradish sour cream drizzle.  I put the ro-tel in a cute bowl next to the potatoes for people to pile on top of their bravas if they like.  Hora de comer!!


ISLAND KITCHEN

LASDI©

LASDI©

This catering job was FUN!  A lot of hard work, but really, really FUN!!  This was for a graduation party, and the theme was Hawaiian.  Now you KNOW I love and appreciate a good theme, and after some communication, we finally agreed on a menu consisting of sticky chicken drumsticks, garlic mashed potatoes, Hawaiian crispy spring rolls, teriyaki meatballs, and a fruit-and-cheese display that ROCKED.  The Hubster built the pineapple stand for the tree in the center of the display, and I am SUPER proud of it!  

A HUGE hit were the Hawaiian crispy spring rolls, and though they weren't a cinch to make on a large scale for 100 people, they are not hard to make and worth the effort if it's for family dinner or an appetizer to entertain.

So I invite you to join me in my kitchen, and let's bring the Hawaiian islands to YOURS!!

HAWAIIAN CRISPY SPRING ROLLS

canola oil

1/2 red pepper, sliced paper thin

2 carrots, grated

8 bamboo shoots, sliced paper thin

green or savoy cabbage, about a half-head, shredded

1 cup bean sprouts (fresh or canned - if canned, drained)

1 cup rice noodles, soaking in warm water

2 tbs oyster sauce

2 tbs soy sauce

sea salt

pepper

10 spring roll wrappers

1 egg, beaten

1/2 pkg unsweetened shredded coconut

Heat enough canola oil in the bottom of a deep pan or wok to cover the bottom, and on medium-high heat for about a minute-and-a-half.  Add all your vegetables and cook everything together until they are soft, but al denté.  Strain noodles and add those to the vegetable mix, and then add oyster sauce, soy sauce, salt, and pepper. Mix well and remove from the heat, and pour into a bowl.  Place a spring roll wrapper in front of you, with one corner toward you so that it looks like a diamond. Brush the edges of the wrapper with the beaten egg. Add about a tablespoon or two of the filling in the bottom part of the wrapper in a thin log-like shape, being careful not to touch the edges. Leave about 1/2 inch at the bottom.  Sprinkle with a bit of the shredded coconut.  Lift the wrapper over the top and tuck it in under the filling. Fold over the left side, and then the right side and roll it up to form a tube-like little package. Brush a little more egg along the top part and seal the roll.  Repeat this process until all your rolls are full and ready to be cooked.  Place a pan over medium-high heat, and sprinkle with enough canola oil to cover the bottom and about an inch up the sides.  Wait until the oil is hot - about two-to-three minutes - and then deep fry the egg rolls until they are lightly brown on one side, turning and lightly browning on the other side. Drain them on paper towels or a cooling rack with paper towel underneath for your roll to stay extra-crispy.

NOTES:  Serve with your favorite dipping sauce, or for these in particular, make it a spicy pineapple sauce!