low-carb

LOVE BIRD

LASDI ©

We don't really celebrate Valentine's Day at Vintağe.  I mean, we DO, but we don’t REALLY. There are several reasons.  One, we celebrate our love for one another EVERY DAY!  No need to pick out one day in particular to prove it as far as we're concerned.  Second, a traditional Valentine’s with all the gifts, roses, candy, and the like, seems like frivolity for our finances.  Now that doesn't mean we don't love love, and we think the world of people who DO celebrate the day!  And being the Themer I am, February means an entire month of wearing red, hearts, and cooking in theme, too!  

This particular meal was definitely dedicated to the Love of My Life, The Hubster.  It was simple, but tasted complex, easy, yet tasted as though I'd been cooking all day!  

Being the low-carb girl of The Fam, I made the rice with bean pasta shaped like rice for the low-glycemic effect, but you can use regular arborio rice or even brown or long grain!  The key here is to make the meal with love, present it with love, and LOVE IT when ya eat it, no matter WHAT time of year it is!

LOVE BIRD

4 slices bacon (see notes)

extra virgin olive oil (evoo)

4 chicken breasts

sea salt, pepper to taste

1 red bell pepper, chopped

1 onion, chopped

1 stick butter

1 cup parmesan

1 cup heavy cream

1 lb cooked rice of your choice

1 large jar of roasted red peppers in water

1/4 cup heavy cream

Preheat oven to 350, put bacon on a baking sheet, and cook to desired doneness (see notes).  While the bacon is cooking, heat a heavy pan (I use my cast iron!) until lightly smoking.  Salt and pepper chicken on both sides, sprinkle a little evoo into the pan and carefully add the breasts.  Keep on medium-high heat and sear until caramel brown, about four minutes on each side.  Remove from the pan and set aside; remove bacon from the oven and also set aside.

Add chopped onion and pepper to the pan and lower heat to medium.  Cook until slightly translucent and a bit of brown starts to show.  Sprinkle it with a little sea salt and pepper and stir.  Meanwhile, add butter to a medium-sized saucepan on medium heat.  Once melted, add parmesan and the cup of heavy cream, stirring until combined.  Add your cooked rice and stir.  Remove onion/pepper mixture from the pan and add to the rice mixture, gently folding until combined.  Place in a warmer to thicken to a risotto-like consistency and to stay warm until you're ready to plate.

Add the roasted red peppers and jar water to the chicken pan on medium heat, and cook on high until the water has evaporated.  Remove from heat.  With a hand blender, carefully blend until the peppers have a thick consistency.  Add the 1/4 cup heavy cream and blend again.  Place the pan back on medium heat and add your seared chicken breasts to the pan.  Allow to come to a slight boil, flip the chicken breasts and cook another few minutes until tender.

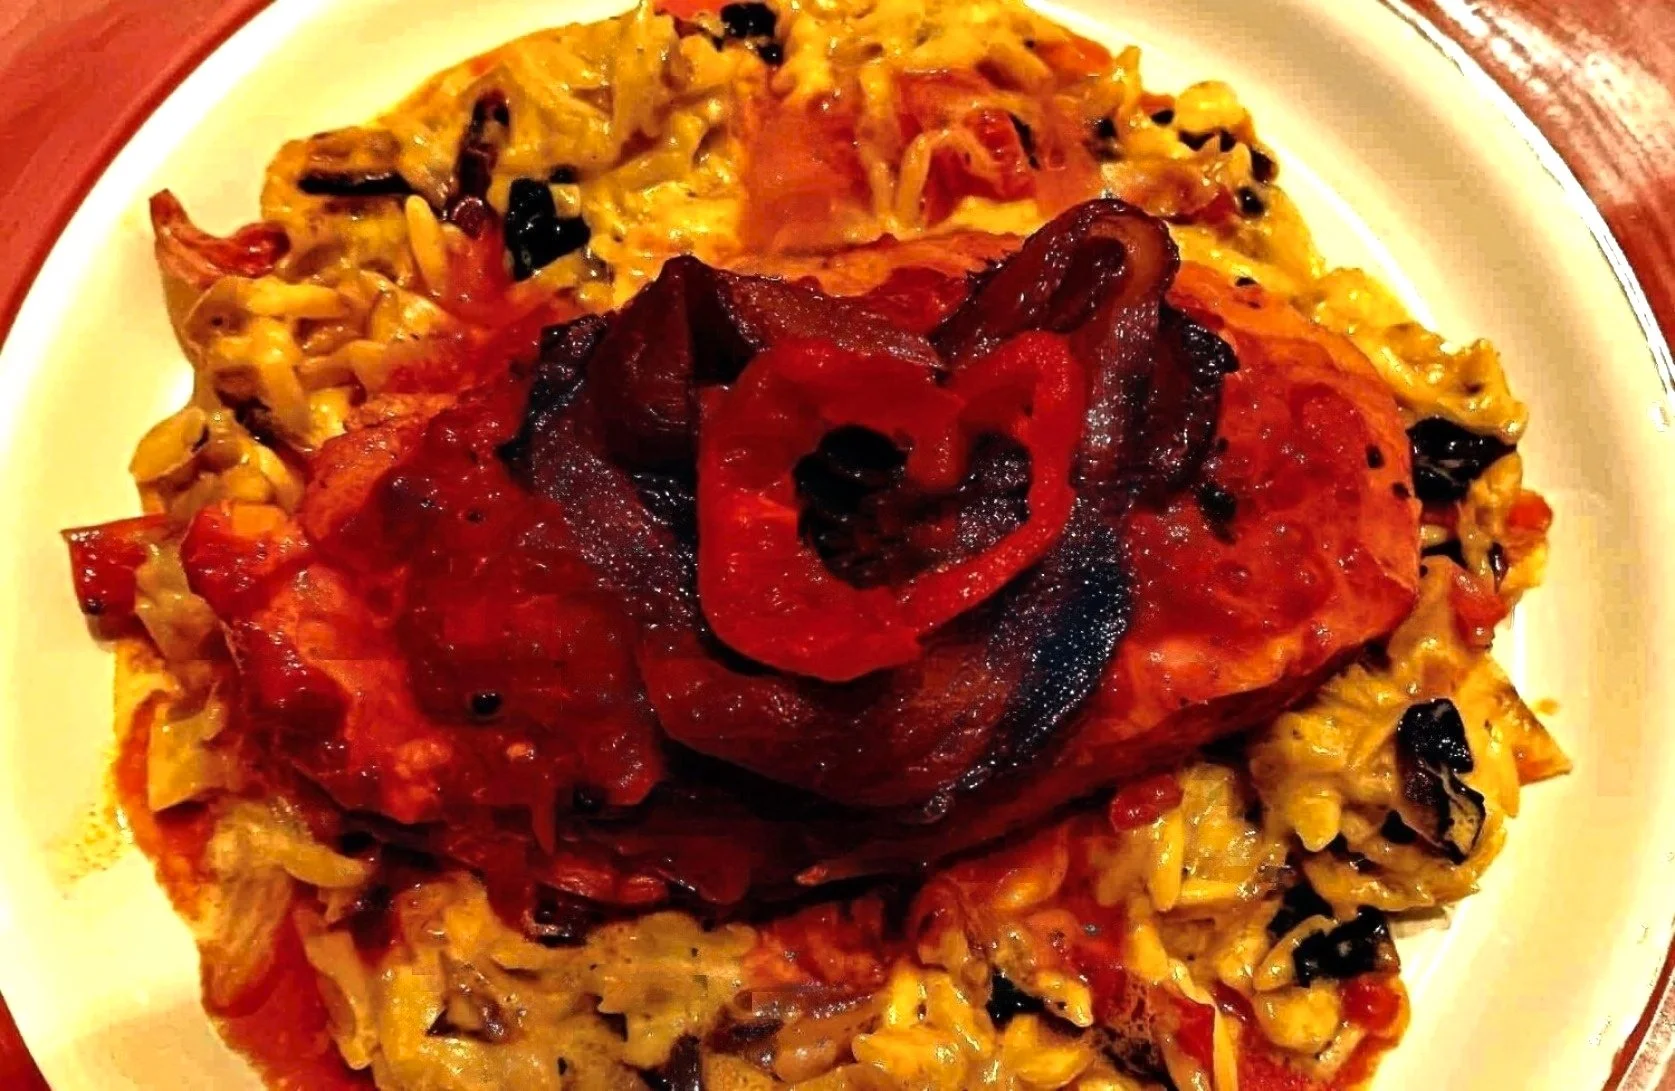
Plate your rice, then gently place your chicken on top using a small spoon to pour some of the sauce in the pan on top.  Place bacon on top of the chicken.  I also used a red pepper to top the whole thing with a "heart", but that's totally optional!  

Enjoy this rich meal with a glass of rosé and dedicate it to the love of YOUR life, too!

NOTES: I use uncured bacon with no nitrites or nitrates, which can intensify the flavor.  Don't use smoked bacon of any kind in this recipe as it will change the flavor profile.  I also put the bacon in the shape of a heart before putting it in the oven to go along with the theme!  Then I lay the red pepper heart on top for added HEART!

SQUASH IT!

LASDI©

LASDI©

Cooking is my love language to others. Food itself is one of my own love languages. I think this is so for most of us. This is the reason I wrote the book A Life of Flavor. It is a book about finding the joy in the dark times life brings us, with matching recipes for comfort. Everything we DO revolves around food, and for my family, we are usually talking about the next meal to come during the one we are sitting together for!

One of the things I really like to do for The Hubster is cook a Saturday morning breakfast. There are very rare times we have a free Saturday morning, so when we do, I like to express my love for him by making something awesome to commemorate the opportunity!

Also, because I want to keep him around for as long as possible, I try to make it as healthy as possible. I’m not ALWAYS able to do so - #RealLife - but do the very best I can. I am the low-carb girl of the family, so I also do my best to keep it that way for him, too. All of those things do not make for an easy-but-awesome breakfast.

Challenge. ACCEPTED.

Here we have a bacon (uncured with no nitrates or preservatives, of course!), egg, and cheese breakfast sandwich. The clencher? The “bread” is butternut squash panny-cakes!! And boy-oh-BOY were they delicious and perfectly bread-like!

I know it is really easy to take a couple of slices of bread out of the package or whatever bread of your choice for a morning sandwich; hear my cry!! This is SO EASY, and SO WORTH YOUR HEALTH.

PS It is PERFECT for September as we transition out of Summer and into the Autumn season!

So try it! Let me know how you like it!

BUTTERNUT SQUASH PANNY-CAKES

2 cups butternut squash

extra virgin olive oil

1 cup almond flour

4 eggs

sea salt, to taste

pepper, to taste

1/2 tsp baking soda

coconut oil

For my butternut squash, I bought pre-peeled and cubed at the grocery store. It’s just easier and faster. I tossed them with a little bit of evoo and placed them on a baking sheet. I broiled them for about ten minutes until they were cooked through, and then put them into a standing mixer bowl. If you don’t have a standing mixer, a hand mixer will do just fine! Place all other ingredients up to coconut oil into mixing bowl and mix unil blended into a loose batter consistency.

Heat heavy pan (I use my cast-iron griddle, flat side!) without oil for about two minutes. Add about a tablespoon of coconut oil before each panny-cake prior to cooking, and adjust heat with each one accordingly. Ladle or pour desired amount onto pan and cook over medium heat until browned. Just like a regular panny-cake, when you see the bubbles on the upside, flip it carefully and cook the other side until brown.

NOTES: This was to be bread for the breakfast sandwich; however, if you would like a sweeter panny-cake, add 1 teaspoon of sugar to the batter and add your favorite syrup after cooking and prior to eating! I just squashed the bacon, egg, and cheese right between two huge pieces and watched it disappear with a smile on The Hubster’s face!

THE IMPASTA

Photos by: Adrian Garcia (LASDI©)

Photos by: Adrian Garcia (LASDI©)

I was cooking for seven families.  Not seven people.  Seven families.  Well, Framilies.  You know what framily is, right?  When you have really good friends you consider to be more like family.  So let me correct myself - I was cooking a meal for seven Framilies!  

We were celebrating being together because our Framily from Hungary (they're missionaries there) were home in The States for a visit and we just wanted to be together and laugh and play games like we do every time they come.

So what does one cook that is inexpensive but delicious, and will stretch among all those people?  PASTA!  Oh, Y'all.  There were so many different kinds of pasta!  For the white "sawse" lovers, I made chicken alredo with the most beautiful rainbow pasta I've ever seen (I bought it at Trader Joe's).  For the meat-lovers, I made lasagna with pasta sheets from scratch and TONS of Italian sausage, ground turkey, and ground sirloin.  But then there's me.  The low-carb girl.  Who happens to LOVE pasta.  But I'm not the girl who can eat even a small plate of it and not gain ten pounds, which is why I'm low-carb in the first place!  So guess what?  I made IMPASTA.  Yep!  I made the most incredible fettucine out of almond flour!  And the best part is: It is only THREE INGREDIENTS!!

With this recipe (made very simlarly to Fathead Dough), I made a primavera with so many gorgeous veggies that it looked almost too pretty to eat!  I also made a simple garlic-butter-Parmesan fettuccine which may have actually been the star of the show! So I have provided the Impasta recipe below for those of you interested in low-carb deliciousness that will knock your noodle-lovin' socks off!

PS - I also made a salad.  You know, for balance.

IMPASTA

2 tsp almond flour

1 cup shredded mozzarella

1 egg yolk

(No, seriously.  That's it.)

Melt almond flour and cheese in the microwave for one minute (or a minute-and-a-half if cheese is not fully melted).  Wait about 30 seconds for the cheese to cool just a little bit and then add an egg yolk.  With a spoonula, press and fold the yolk into the melted cheese until it's completely mixed into the cheese, and gives a yellow appearance.  Reheat the cheese for 10-15 seconds.  Spray two pieces of parchment paper with cooking spray for rolling the dough out.  Roll out to about 1/4 inch thick, using one piece of parchment on the bottom, and the other piece of parchment paper on top to keep the dough from sticking to the rolling pin or your work space. Don't roll it out too thin.  

Slice fettuccine strips and let dry in the fridge for about four hours.  Bring a pot of water to a boil, cook for one minute, and then strain with a colandar, making sure you immediately pour cold water over the pasta, so the noodles don't stick to each other too much.

Reheat with any "sawse" you prefer together in a pan, or reheat in your microwave with a little butter for about 20 seconds.

NOTES:  What do you call a fake noodle?  (Oh, come on.  You get it!)

DROP IT LIKE ITS HOT

LASDI©

LASDI©

It is SO HARD during the holidays to eat healthy, isn't it??  What is it about the season that makes us (me included!) think that it's a free-for-all?  Well this year I have been super-intentional about making sure The Hubster and I don't constantly indulge, but rather try to make healthy foods that taste rich and delicious; like we're not missing out.

So for Meatless Monday (which does NOT sound rich and delicious, does it?) I decided to make something souper-rich (see what I did just there?) with an Asian flare.  And this low-almost-no carb meatless dish did NOT disappoint!  Hot soup on a cold day!  PS  This is so easy it shouldn't taste like the indulgence we experienced!

CARAMELIZED ONION AND EGG DROP SOUP

1 onion, halved, both halves sliced thinly

3 tbs extra virgin olive oil (evoo)

1 tsp sea salt

pepper

32 oz box chicken broth

1/4 cup soy sauce

3 green onion, chopped coarsely

3 eggs

1 tbs water

2 tbs sesame oil

Sprinkle evoo into a soup pot and heat on medium-high for about one minute.  Add onions, stir, and let them cook, untouched, for about three minutes.  Sprinkle with sea salt and pepper to taste, stir, and let them cook, untouched, for another three minutes.  Stir, and let cook, untouched for another five minutes. or until caramelized and brown.  Pour chicken broth and soy sauce over onion and bring to a boil, add green onions then turn heat down to low.  Cover and let simmer for 20 minutes and turn heat back up to medium.  Whisk eggs and water in a separate bowl until well-blended and a little frothy.  Slowly pour into the soup mixture, whisking the soup as the eggs go in.  Cook an additional minute or two.  Turn off heat, add sesame oil and gently stir.  Serve with garlic sesame not-bread sticks. 

NOTES: I garnished with chopped parsley, but cilantro would also work here, or no garnish at all would still be yum!

GARLIC SESAME NOT-BREAD STICKS.

(a variation of Fat Head Dough)

3/4 cups almond flour

2 tbs cream cheese

1 1/2 cups shredded mozzarella

1 tbs garlic powder

pinch of sea salt

1/2 tsp pepper

1 egg

1/4 cup sesame oil

sesame seeds

Preheat oven to 375 degrees.  In a bowl, add almond flour, cream cheese, mozzarella cheese, garlic powder, sea salt, and pepper.  Microwave for one minute.  Stir and microwave another 20 seconds.  Add egg and stir until egg is blended into dough.  place between two pieces of parchment paper (see notes) and shape into a rectangle about 1-inch thick.  Remove top piece of parchment paper and bake for about fifteen minutes or until just golden brown.  Spread sesame oil over top of baked dough, sprinkle with desired amount of sesame seeds and bake another five minutes.  Take pizza cutter and slice into bread sticks.  DIP INTO CARAMELIZED ONION AND EGG DROP SOUP!!

NOTES: Parchment paper is key here.  I've tried this with foil and it is sorely disappointing.  PARCHMENT PAPER.  Trust me.

This combo is PERFECT and comforting for this cold holiday weather as well!  Merry Christmas!


LIFE'S A BEACH

LASDI©

LASDI©

This particular catering gig was in June, so being the Themer-Girl I am, it only made sense that the summer menu was called Beach Party Roast.  It consisted of roasted salmon, roasted mini-sweet peppers loaded with green onion, cream cheese, and shredded cheddar, roasted asparagus, roasted beach bread, and sandy beach parfaits that I found a recipe for from a Texas-girl blogger.  With all of that yumminess, the peppers got quite a bit of attention.  I had the opportunity to pop a few in my mouth, and could completely see why they were so addictive!  Plus they're easy to make and low-carb!!  Shout out to The Daughts for the cute-and-appropriate title to this post!

MINI SWEET PEPPER POPPERS

1 bag tri-colored mini sweet peppers (about 20) seeded, and cut lengthwise

1 block cream cheese

1 1/2 cups shredded cheddar cheese

1 bunch green onion, sliced thin (both green and white ends)

1 tsp sea salt

1 tsp pepper

Combine cream cheese, shredded cheddar, green onion, sea salt and pepper in a bowl.  Microwave for 15 seconds.  Mix well with a spoon and let stand about a minute or two.  Scoop a mound of cheese mixture into each pepper and press into pepper, careful not to over-mound so your cheese doesn't leak out during cooking.  Refrigerate for about an hour.  Heat oven to 400 degrees and bake peppers for 20 minutes; switch oven to broiler and broil peppers until cheese is brown and bubbly - about five minutes.  Let rest five minutes before serving, then pop a few in your mouth before putting them on the table because they go quick!!

NOTES: These are great for your Vegetarian Friends.  For you Meat Eaters, and for extra flavor, you can crumble some bacon into the cheese mixture, or just about anything you like!  I know an entire bunch of green onion seems like a lot, but it really lends an herbaceous, chivey taste to these loves.  For July, and some added heat, I use jalapenos in place of the sweet peppers for hot pepper poppers!  These are great served warm or room temperature and make a great side or appetizer.  

BREAKING BREAD

LASDI©

LASDI©

You won't believe this.  I mean, it took me a few blank stares and lots (and lots!) of tastes to believe it myself!  

As you know, I'm the low-carb girl of the family, and quite often cook that way without The Hubster even noticing.  Well, this is another sneaky-not-sneaky way of getting our low-carb on without allowing him to feel like he is missing out on anything.

For Superbowl Sunday,  he wanted wings and turkey burgers.  So of course I made them instead of buying them because that way I can control the ingredients.  For the burger buns I made cauli-bread.  Yes, I know.  That doesn't sound like the appealing direction I was taking when you first started reading.  But trust me here - this was OUTSTANDING!

I took a few recipes that I found along with some that were sent to me, added my own flare and touches, and came up with what I think is the best "bread" you could ask for!  This recipe is for flat, round buns.  And it was beyond delish!

CAULI-BUNS

1 head cauliflower, "riced" (Or if you can find it pre-made in a bag, PERFECT!) (see notes)

3 eggs

1 cup mozzarella cheese

1/2 cup Parmesan cheese

1 tbs sea salt

1 tbs pepper

Heat oven to 350 degrees.  Combine all ingredients in a bowl.  Line a baking sheet with parchment paper (this is CRUCIAL for the success of these "breads").  Place mounds of the cauli-mixture into whatever mold suits your purpose.  In this case, it was the same round mold we used for the turkey burgers so they would fit perfectly.  Bake for about 20 minutes.  here's the thing: if they are not golden brown on top, WAIT UNTIL THEY ARE.  Flip for 5 more minutes.  Let rest for a minute or two before removing from the baking sheet.

NOTES:  Don't use frozen cauliflower or froze riced cauliflower, as there will just be too much moisture.  The other thing about this recipe is you can litch-rah-lay do whatever you want to make it INTO whatever you want.  For example: add lots of Italian seasoning and plenty of garlic and shape it into a long mound and you've got breadsticks!  If you want, you can add fresh sage and a tiny bit more sea salt and you've got hasbrown bread!  If you like, you can add cheese at the very end and heat until melty and you've got cheesy bread!  This is also SHEsTox-friendly for Week Three!  I promise you this, you will NOT believe how "bready" these things are.  It's delicious INSANITY without the carbs!

Mellow Yellow

LASDI©

LASDI©

So there I was, staring at another piece of fish and wondering how in the WORLD I was going to put it on a plate with  a little variety.  I considered my obsessive compulsivité with colors and months and wondered if I could fit in that it was August and that means yellow.  I looked in the fridge for whatever veggies I might have to help out, and lo-and-behold!  I found yellow squash, yellow bell peppers, and lemons!  I made lemon-thyme cod, sauteed peppers and onions, and yellow squash moots-a-rell au gratin.  This was going to be fun AND delicious to cook AND eat!  This is totally Week Three-friendly for the Detox & Cleanse, low-carb for all you low-carbers, and delicious for all you EVERYONES!!  

YELLOW SQUASH MOOTS-A-RELL AU GRATIN

4 yellow squash, sliced about 1/2 inch thick

1 can rotel

1- 8 oz pkg mozzarella cheese

1 tbs sea salt

1 tbs white pepper

1 tsp garlic powder

Place one even layer of squash in a prepared 9x13 baking pan, sprinkle with half the can of rotel, mozzarella cheese, sea salt, pepper, and garlic powder.  Place the rest of the squash in a layer over the first layer, then repeat with the other half of the rotel, seasonings, and cheese.  Bake at 350 degrees for about 20-25 minutes, or until golden brown and bubbly on top.


My Crabby Friend

Photo Cred: HERE

Photo Cred: HERE

My friend, Hugh Durlam, is a FANTASTIC cook.  And when he decided to do my Inside-Out Detox & Cleanse (aka, and lovingly referred to as the "SHEtox") I knew he would make a mockery of the fear of what to cook.  And I was right!

When he made these beautiful crab cakes for a Week Two-friendly meal, I knew I needed the recipe.  He agreed that I could share it with you all.  You're welcome.

DURLAM'S LOW-CARB CRAB CAKES

1 head of cauliflower
1lb lump crab meat, cleaned and picked for shells
2 eggs, beaten
2 green onions (scallions), chopped
2 oz crumbled feta (Week Two) or fresh shredded Parmesan (Week Three). And buy the good stuff (treat yo self!)
onion powder
garlic powder
sea salt and pepper

Preheat oven to 350.  Pulse cauliflower in processor. layout flat on parchment on large cookie sheet. Place in oven for 10 min. Place towel or cheese cloth into bowl. Dump cauliflower on to towel. Grab the loose ends of the towel like a hand and start to twist the cauliflower into a ball, twisting and squeezing as hard as you can. you'll be surprised how much water comes out. 
Now drink that water!
Did you drink it?
That's gross! :)

Mix all ingredients in large bowl. Heat up your skillet with extra virgin olive oil.  Make tight patties in your hand and place in hot pan. (Should sizzle) Cook about 5 min on each side. Flip carefully as they don't tend to stick as well as the fattening ones do.

Makes 10 patties!

NOTES: I made them and used parsley in the mix, as well as some fresh herbs I had in the fridge.  WONDERFUL!!  Made me feel crabby, too!